
AUDIO & VIDEO
The purpose of audio & video production is to refine and build the final product for each client to publish to their respective platforms.
Spreadsheet Production Key
The audio & video team play a crucial role in keeping the spreadsheet updated with the correct color for each episode.
We use the same color key guide for every show so it’s easy to remember. It’s also posted at the top of each spreadsheet. It’s important to change the entire line a color, minus the show notes cell, when updating for a where the episode is in the production process.

AUDIO
Software Used: Adobe Audition
After the client loads the recorded assets to the To Be Edited folder…..
EDITING STANDARDS & WORKFLOW
Load the assets (openers, closers, interviews) into Audition using the File → Open capability.
a. Dragging and dropping from finder can corrupt files, so load them as stated above.
Convert all stereo files to mono.
b. If interviews are recorded in separate tracks, split them into separate Left and Right files and save to the appropriate numbered folder.
Drag all files to the match loudness panel from the Audition file menu.
Match Loudness to these settings:

5. Capture a noise print of the ambient background noise and run a Noise Reduction Process.

6. Mix down any interviews in the multitrack, looking through to fix any overtalk or remove any unnecessary noise under the conversation.
7. Only if necessary, run a Delete Silence to these standards:

8. Hard limit each file to these standards:

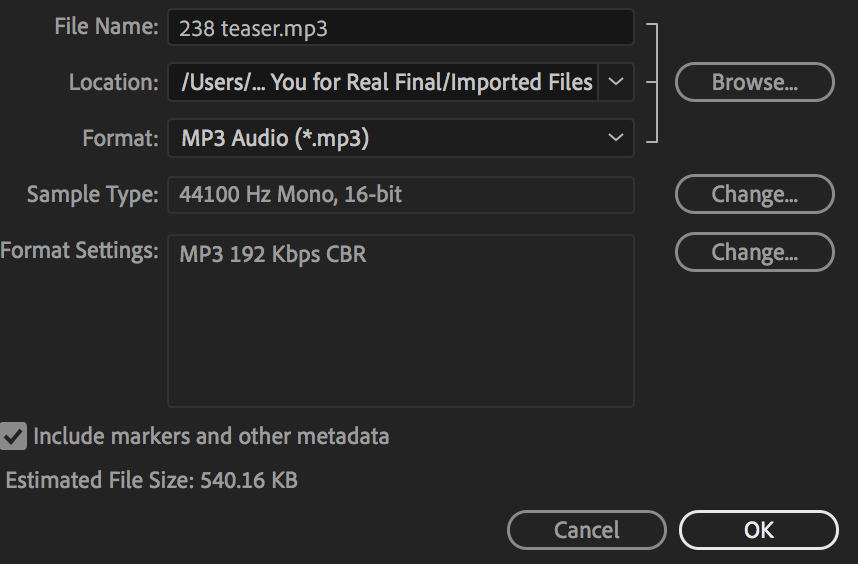
9. Save the mastered files to these stats (format, sample type):
10. Each file name should be placed in the appropriate TBE folder
11. Follow this naming format: Episode Number Guest Name Asset Type (Editor’s Name)
Example: 267 Joe Kenn Show Intro (Caleb)
Example: 066 Allison Holzer Main (Edited)
12. Keep all files in mono until the final episode is built.
TEASERS:
Teasers, marked by the editors during the editing process, should be copy / pasted into a separate mp3 file, titled:
Show Number TEASER
and placed in the appropriate numbered folder.
BUILDING:
1. Again using the File → Open capability in Audition, open all assets (including show intro and outro).
2. Build each show according to the Show Flow chart in the client’s main DropBox folder set.
3. Mix down the final audio to mp3 using the same stats above, convert it to stereo, and place the Final version in the Ready to Load folder. Always keep a Final copy in To Be Edited.
4. Name the final audio file to be published using this naming format: Episode Number Show Name (or abbreviation) Episode Title Final
Example: 215 FT Profit First In Your Business with David Richter Final
Example: 267 PhysPrep Joe Kenn on 32 Years of Continued Success in Physical Preparation Final
Example: 025 S&TS Contract with God Memoir of a Juvenile Killer Final copy
5. Move the final audio file to the client’s “Ready to Load” Dropbox folder (sometimes named Load to /platform name/ )
6. All episodes assets (original, edited, etc) eventually should be moved to the client’s “Complete Folder” and named as Show Number Episode Title
AUDIO POSTS:
Audio posts are created at https://app.wavve.co using the company login. There are existing projects for all clients who have us creating their audio posts - edit the corresponding one as necessary. Some clients have the title of the episode on each audio post, some have guest images, some simply have the teasers added.
Place the finished .mp4 audio posts in the Audio Posts folder for the appropriate client.
Each file name should follow this naming format: Episode Number Show Title
Example: 262 Ashley Jones on Planning, Programming and the Quadrant System in Rugby
Example: 246 Darcy Norman on the Value of Working with Interesting People
VIDEO
Video Stripped To Audio Podcast Packages & Examples:
Software Used: Final Cut (Lee) ; Adobe Premier (Iris) - either software is fine as long as you’re comfortable with it.
Submission Requirements: Recordings at 1080p with HD resolution as a .mov or .mp4 files.
Creation Timelines:
7-10 days for the initial asset creation (intro, outro & lead magnet) with 1 round of edits (maybe 2 if they are quick and simple changes).
A 10 show launch needs 3-4 weeks lead time
Weekly episodes can be on the normal rotation of 7 days before publish date.
Where to find different assets:
Asset Names - Status - Dropbox Location
Album Art Animation - permanent/previously created - Album Art folder
Intro - permanent/previously created - Intro Outro folder
Lead Magnet - permanent/previously created - Intro Outro folder
Opener - Episode specific and provided weekly- To be Edited folder
Main Show - provided weekly - To be Edited folder
Outro - permanent/previously created - Intro Outro folder
General Video Workflow:
Videos are built in the same show flow as the podcast, using the video assets for the Intro, Lead Magnets, and Outros. The videos, however, are not edited for “ums & uhs” - nothing is removed except when directly requested by the client.
Video Creation Steps:
Download video recordings from the client’s TBE folder
Audio Cleanup First (in Audition)
For “Best” package, typically use audio from Camera 1 only because it sounds better
Copy a previous project to use as a template
Import all files into Final Cut (video, audio, pre-created assets)
Color Correct, if needed, based on brand guidelines
Add in small graphics, guests name, logo into the main episode following brand guidelines
Then take the cleaned up audio & sync it with the whole thing. (intro through outro)
Render & Export Video
Compress all videos to .mp4 at 720p, and load to the Video Ready to Load folder.
Extract audio for the podcast load.
The sections in the video where it fades in and out, those sections will need to be shortened and music added underneath for the podcast audio.
Package Specific Details
GOOD:
Single Camera
Combine pre-created video assets according to show flow
No additional skins or animation
BETTER:
Single camera
Combine pre-created video assets according to show flow
Add skin animation branded frame based on client branding guidelines for solo shows and remote interviews
BEST:
Multi-camera
How to cut with 2 cameras
Line up both long files for camera 1 and camera 2
Cut based on which camera the client/guest is looking at
Use cuts to full screen
Combine pre-created video assets according to show flow
Add in animated graphics
Sound Designed